Friday, February 20, 2015

Eggless Chocolate Cake with Chocolate Frosting

Happy Valentine's Day to all my readers :)
I know I am late to wish you guys but as you know I dont get much time to post here due to my 16 months old baby :)  Hope I am excused now :)
Now lets come to today's recipe.  For making our Valentine's Day special, I made a super special chocolate cake and I was so keen to share the recipe with you as the cake came out so yummilicious.
I was so confused whether to make an eggless cake or one with egg.  Finally ended up on eggless and made it.  As I wanted it to look nice I also made a chocolate frosting that complemented this cake very well.
All my efforts paid off when hubby tasted the cake and said DELICIOUS !!!! :)
As I made it specially for Valentine's Day I could'nt take nice clicks but trust me it was the best cake I have made so far.  Soft, moist and super chocolaty.  I recommend to try it once.
Now coming to the frosting.  Its so easy that you wont even think twice to try it out.  It was so yummy that I couldn't stop myself licking the spoon to have those last drops dripping from it hehehehe.  You don't need any cream or butter to make this frosting and the end result will amaze you completely.  
You know what, in this whole recipe I have not used any butter :) isn't it great.. 
I had shared this cake with two of my friends (P and T) also and they too liked it very much.. and gave some nice complements.. that was so nice of you gals :)
Okay so now I am leaving you with this super yummy chocolaty chocolate cake. Do try and enjoy.  Happy Cooking :)


Ingredients:


For the cake

All purpose flour
1 ½ Cup
Coco Powder
¼ cup
Brown sugar
¾ cup
Oil
¼ cup
Baking powder
1/8 tsp
Baking soda
1 tsp
Salt
1/8 tsp
Vanilla essence
1 tsp
Water
1 cup + 2 tbsp
Lemon juice
1 tsp
Choco chips
2 tbsp
Coffee
¼ tsp


For the chocolate frosting

Grated dark chocolate
¾ cups
Choco chips
½ cup
Milk
½ cup
Drinking chocolate powder
3 tbsp
Vanilla essence
½ tsp
Castor sugar
1 tbsp


For honey syrup

Honey
1 tbsp
water
1 tbsp


For decoration

Glaced cherries
3
Colored sprinkles


Method:

  • Take a square 8 inch baking pan or two round 4 inch baking pans and grease with oil then dust with some flour.  Keep aside.
  • Sift together all purpose flour, coco powder, baking powder, baking soda and salt.  Set aside.
  • In a mixing bowl, take water and add in brown sugar, vanilla essence, oil and lemon juice.  Mix everything very well so that sugar gets dissolve.  Add coffee and mix again. 
  • Preheat the oven at 180 degree.
  • Take the flour mix and add in little by little to sugar water mix.  Mix well to avoid lumps.  
  • Finally add choco chips and give a quick stir.
  • Shift the batter to baking pan/pans.  (If using two baking pans divide the batter equally in both the pans).
  • Bake for 35 minutes or till a knife inserted comes out clean.  
  • Remove from oven and let it cool for 5-10 minutes (not more than that).
  • Take it out from the pan and keep on a wire rack till it gets cool.
  • Cake ready.

Frosting
  • Take grated chocolate and choco chips in a mixing bowl.  Keep aside.
  • Take the milk in a saucepan and put it on flame.  Add in castor sugar and let the milk boil.  Once boiled remove it from the flame and add vanilla essence.
  • Pour the boiled milk over the chocolate chips and leave it for 2 minutes.  Whisk well and keep it in the fridge and keep whisking every after 1 hour till you get the right consistency.once the chocolate gets melted with milk add in drinking chocolate powder and whisk again.
  • Again put it in the fridge to get the desired consistency.  
  • If you want a bit thick frosting add some more drinking chocolate powder or if you want a bit thin frosting add some more milk.
  • Frosting ready.
Honey syrup
  • In a small bowl, add honey and water.  Mix very well.  Syrup ready.
Process of assembling
  • Take the cake, honey syrup and frosting. 
  • I made one square cake and cut it into half to make the double layer.  If you make two small cakes, take one cake and brush the honey syrup generously over it.  Repeat the same with the lower part of the other cake.  Leave the cakes for 10 minutes.
  • Then take the first cake and put some frosting over it.  Spread the frosting over the cake evenly and sandwich with the other cake and frost it similarly with the frosting.  Cover the whole cake with the remaining frosting from all sides.  Decorate with sprinkles and glaced cherries.
  • Keep the cake in the fridge to get it set atleast for 2  hours.
  • Enjoy.


Notes:
  1. White sugar can also be used in place of brown sugar.
  2. The batter should be a bit watery.  If you find it thick add 1-2 tbsp water.
  3. You can replace the dark chocolate with choco chips.
  4. For the frosting, if you don't have drinking chocolate powder you can decrease the quantity of milk by 1/4 cup to make the frosting.
  5. Do not remove the cake from the pan immediately else it could break.  Let it rest for 5-10 minutes.
  6. You can decorate the cake as per your wish.
  7.  Keep checking the cake after 20 minutes of baking.  Mine took exact 35 minutes to bake.  However, every oven takes different time for the same job so keep an eye.

Wednesday, February 11, 2015

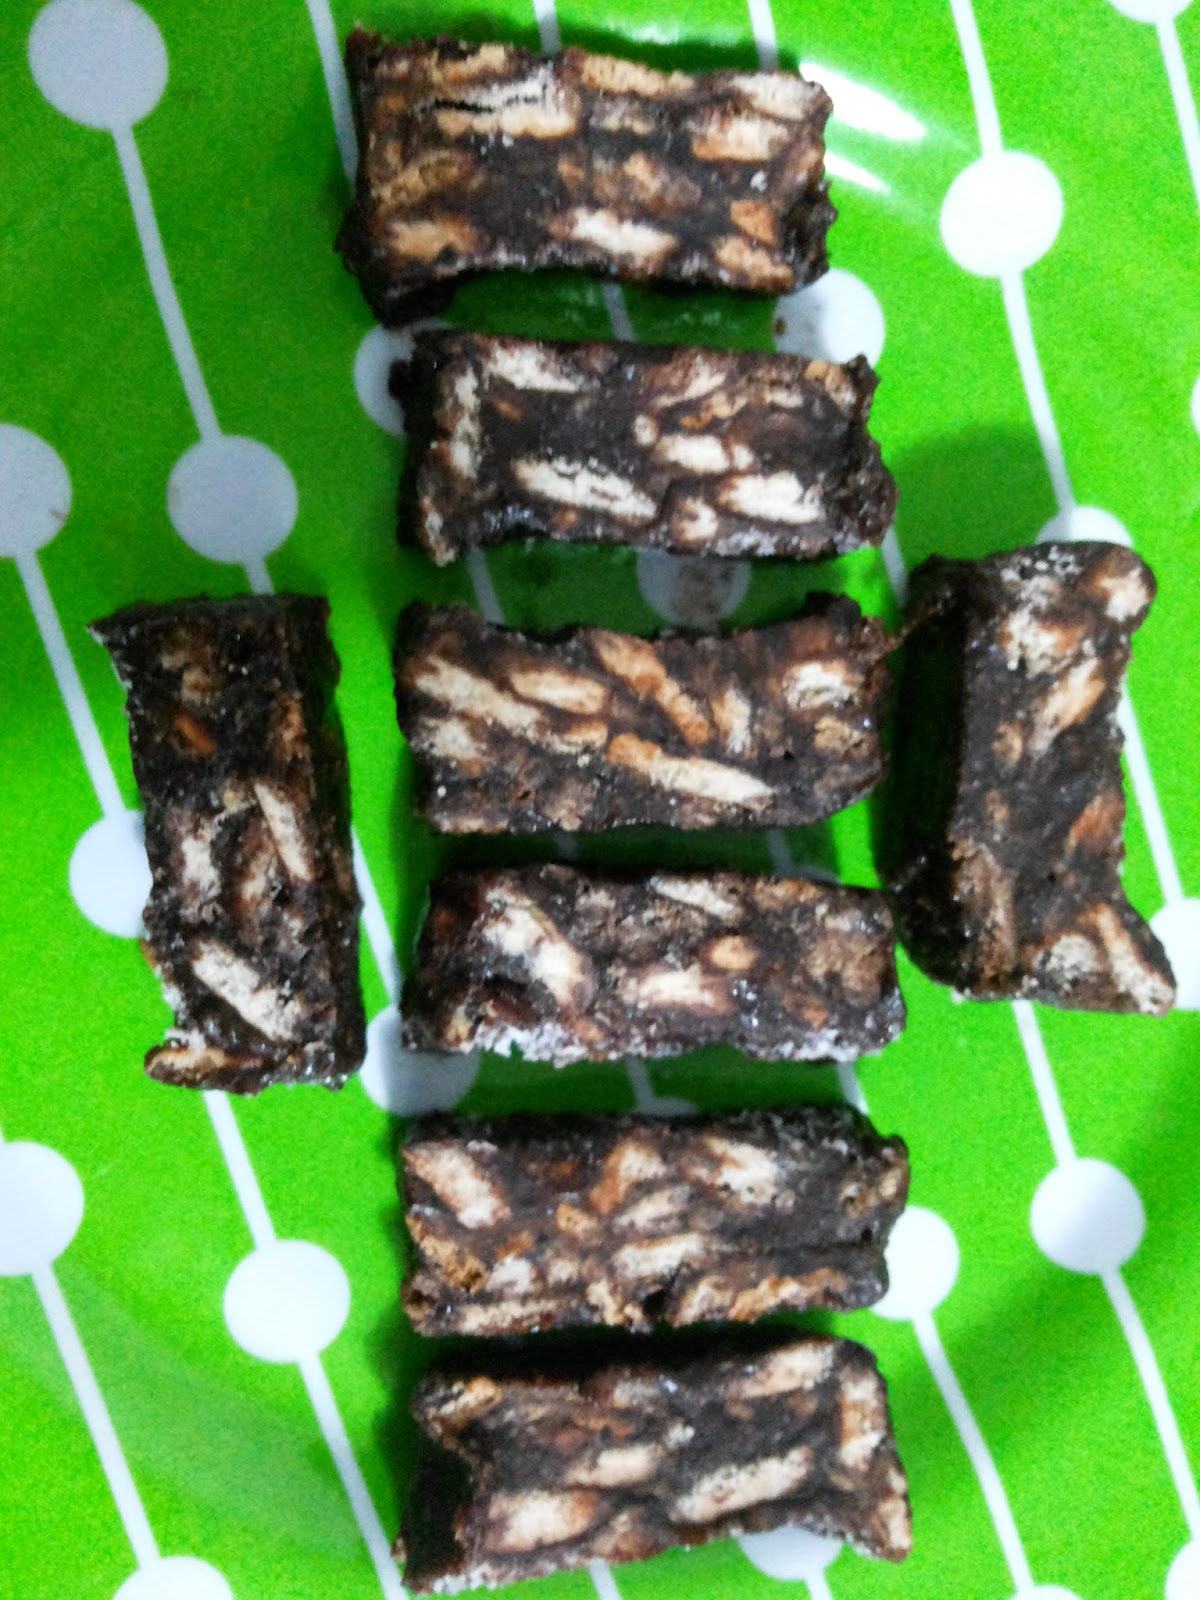
Sticky Choco Bistix

Hello to all.  So finally I am here after almost a month.  Actually, I was feeling too lazy to type anything  But its better late than never hehehehe.
Today I have come up with an easy peasy recipe which would be a hit with the kids.  No fancy ingredients and no consumption of your precious time :)
I had all the ingredients in hand and a big packet of marie biscuits which was begging to be used .. so I add up a few more things with it and got this yummy dish called sticky choco bistix.  After tasting it for the first time I was so thrilled coz it was too good but when I thought of posting it here I had no name for this dish.  It was a bit sticky and had a lot of chocolate with biscuits, hence this name.
Hope you will try it for your kids.
So no more chit chat.. just try it and enjoy.
Happy Cooking :)


Ingredients:

Marie biscuits or any digestive biscuit
5
Coco powder (unsweetened)
3 tsp
Sugar
4 tbsp
Milk
¼ cup
Desiccated coconut
1 tsp
Salted butter
1 tbsp
Any chocolate (grated or cut in small pieces)
(I used ½ of a Bar One chocolate)


Method: 
  • Take biscuits and crush them coarsely (do not make powder).
  • Grease a very small loaf pan (I used a small silicon loaf mould).
  • Heat a non stick pan. Add butter. Let it melt. Add milk and mix well. Once milk gets heated up, add coco powder and mix it well to avoid the formation of lumps.  Add sugar and mix again.  Add chocolate pieces and mix well.  Heat the mixture till the chocolate melts, don’t forget to keep stirring the mixture continuously. Cook for 2 minutes.  
  • Let the mixture be a bit thick.  Add crushed biscuits and mix everything very well.  Remove from heat and pour the mixture into the greased mould/pan.  Even the top.  Sprinkle dessicated coconut and press it with the spatula.
  • Put the mould in the fridge for atleast 1 hour.
  • Unmould and cut into desired shapes.


Notes:
  1. Any lightly sweetened biscuits can be used.
  2. Brown sugar can also be used.
  3. Chopped nuts can also be added.
  4. Do not over cook the mixture.

Saturday, January 17, 2015

Raspberry Jelly Yoghurt Parfait

Hi friends.  Today I have come up with a new recipe that is so easy yet yummy.  Its a nice dessert to serve in the parties too.  
Last week I was thinking to make some parfait but was just bored with the usual ingredients.  I thought of a lot of different things and finally experimented with Jelly.  I had a pack of Raspberry jelly waiting to be used so I used it for making this parfait.  Here I used half of the 80 gms packet of the jelly.  In place of cream cheese I used hung curd to make it a little healthy.  For the base, I used chocolate cream cookies but you can use any cookies of your choice.  Finally, I topped this dessert with some sprinkles, choco vermicelli and glaced cherries. I place this dessert to chill in the fridge overnight and in the morning when I tasted it, it was simply heaven.  Everything came out together very well and gave a very nice creamy and crunchy taste with raspberry flavour.  Its a melt in mouth dessert and a must try. V liked it very much.  Even my LO liked it a lot. Its a sure shot recipe.  So what are you waiting for guys? Try it out.  Happy Cooking :)


Ingredients:

Curd / Yoghurt
500 ml
Sugar (powdered)
3 tbsp
Raspberry jelly
40 gms
Chocolate cream cookies
5
Vanilla essence
5-6 drops


Method:

For the hung curd - 
  • Take a bowl and put a strainer over it.  On the strainer, put a muslin cloth or clean kitchen cloth and pour the curd over it. Keep the bowl in the fridge for 2-3 hours.  (Sometimes, I take a bowl and place a big tea strainer over it then I pour the curd directly on the strainer and place the bowl in the fridge. You can try any method.)  The curd will come out good in either way.
  • After 3-4 hours, take out the bowl and shift the thick curd in a bowl from the muslin cloth.  Hung curd is ready.

Hung curd
  • Take the hung curd and add powdered sugar and vanilla essence in it.  Beat well with the help of a whisk.


hung curd mixed with powdered sugar and vanilla. So creamy.

For the jelly -
  • Boil 100 ml water in a non stick pan. Remove from the flame and immediately add the jelly granules in it.  Mix well till the granules melts completely.  Then add 20 ml of cold water, mix again and pour the mixture in moulds and place in the fridge for 3-4 hours.  Jelly is ready.  Coarsely mash the jelly and set aside.

Cookies base-
  • Take the cookies of your choice.  I used chocolate cream cookies.  Place the cookies in a plastic bag and coarsely powder with the help of a pastry roller.  Shift it to a bowl and set aside.

I used these chocolate cream cookies

Steps to combine the parfait-
  • Take two serving glasses.  First of all, place a layer of crushed cookies in the bottom of the glass. Now, top it up with a layer of mashed jelly, then put a layer of hung curd.  Repeat the process once again.  Place glazed cherry on the top and sprinkle some choco vermicelli and sprinkles.  
  • Cover with cling film and place in the refrigerator for 3-4 hours.
  • Serve chilled.


Notes:
  1. You can use any cookies of your choice.
  2. Do not leave hung curd outside for draining.  It may get sour.  Always put it inside the refrigerator.
  3. You can use any kind of jelly but it should be of a strong flavour.
  4. Always use the instructions on the pack for making the jelly.
  5. Chill the parfait before serving.
  6. You can garnish it with tutty fruitty or grated chocolate or even brown sugar.  


Tuesday, January 6, 2015

Eggless Molten Choco Lava Cake

A big hi to all my readers.  Hope your new year is going very well just like mine.  These days I am going very busy with Mishi (my LO). And whenever I open my laptop to post something she starts banging her fingers on the keyboard.  She simply loves it.  If she is with laptop, it is almost impossible to divert her mind to any other thing.  Anyways, I shall keep trying to write whenever I find it possible. 
Lets come to today’s recipe.  Today I am going to post a very special recipe i.e. molten choco lava cake. Its my all time favourite and is very close to my heart.  Actually the thing is, during my pregnancy, I used to have sudden cravings, mostly in the odd hours.  So one night I had suddenly started craving for this cake..that too very strongly.. the molten chocolate had started filling my mind  hehehe.  That time I was with my sister-in-law (big sister of my hubby) so I shared my wish with her..and even  at that odd time she immediately taken me to Dominos and satiated my crave .. it had happened so many times for different things but she never ignored my silly demands even once... that was so sweet of her.. she is such a darling... .. love you didi J


So that was the story behind my extra love for this cake.  I was thinking to try this cake for a long time but was a bit hesitant.  And two days back when I finally gathered courage to try it, it came out soooooooooo yummy and I was more than happy on my success.  I had never thought, even in my weirdest dream, that I would ever be able to make it at home but see I had made it all by myself  J 
I generally do not like chocolate cakes much but the molten chocolate oozing out from this cake is just irresistible for me.  This cake is a visual treat.  I am 200% sure that you guys will surely love this cake.  It is totally eggless and the taste is awesome (just like the Domino's).  In short, its an Insanely delicious dessert that is incredibly easy to make.  
Here I am posting the full procedure to make this cake.  Please please please try it out and enjoy with your family.  Happy Cooking  :)


Ingredients:

All purpose flour/Maida
½ cup
Cocoa Powder
6 tbsp
Baking powder
½ tsp
Baking soda
½ tsp
Dark chocolate chips or grated dark chocolate
¼ cup + 2 tbsp for filling
Butter
¼ cup
Castor sugar
½ cup + 1 tbsp
Curd
½ cup
Milk
½ cup


Method:
  • In a mixing bowl, sieve together all purpose flour, cocoa powder, baking soda and baking powder.  Set aside.
  • Melt chocolate and butter together in a microwave safe bowl or in a double boiler. Once chocolate is melted, add castor sugar in it and mix well. 
  • Preheat the oven at 180 degree and grease some silicon muffin moulds with butter and dust with cocoa powder.  Keep aside.
  • In the chocolate mix add half of the curd and milk and mix well.  Add flour mix and fold well.  Then add the remaining curd and milk.  Mix everything again.
  • Take the muffin moulds and fill the same till 1/4 with the cake batter, put some grated chocolate in the middle and pour some more batter over it.  Fill the mould till half.  Repeat the process with remaining batter as well and bake it for 9 minutes.
half filled moulds
  • Remove from the oven.  Let them slightly cool and unmould carefully in the serving plate.  
  • Dust with icing sugar and serve warm.


Notes:
  1. If you wish you can make this cake without filling the grated chocolate in the middle.
  2. Do not experiment with the quantity or ingredients mentioned here.
  3. I recommend to use silicon moulds or porcelain ramekins to make this cake.
  4.  Do not bake the cake more than the mentioned time or it would be baked from the inside and would lose its molten texture.


Thursday, January 1, 2015

Pineapple Rava Kesari

Wish you all a very happy new year 2015.  New year, new beginning and new dreams, may all of that become sweeter than ever for you all.  
To make this new year a little more sweet and yummy I have made this Pineapple Rava Kesari.  A wonderful dessert that everyone would like to dig in.  Its so simple to make yet so delicious.  It sounds and looks so festive I must say.  This is the first time I have tried my hands on making this Kesari but it came out simply superb.  We all loved it to the core.  I would love to make it again and again.


Pineapple gives this kesari a unique flavour.  As I wanted a strong pineapple flavour I used pineapple essence but this is completely optional, even without the essence you will get the nice flavour of this kesari.  I used very little ghee but felt no compromise with the taste.  I strongly recommend to use less ghee as it is not needed to use more ghee as all the flavour will come from the pineapple but do not compromise with the sugar.  Use the exact amount of sugar that is given in the recipe.  I increased the amount of sugar little by little by checking its level during cooking and finally ended up using the amount I have given here in the recipe.  I added cashews also but you can skip this part or may add any dry fruits of your choice.
Now no more chitchat, I am leaving you here with this yummylicious dessert.  Try out and enjoy this new year.  Happy Cooking :)


Ingredients:

Rava/Sooji/Semolina
4 tbsp
Pineapple (chopped)
½ cup
Sugar
5 ½ tbsp
Cashews (chopped)
5-6
Cashews for decoration
2
Ghee
1 tbsp
Pineapple essence (optional)
¼ tsp
Yellow food color
1/8 tsp
Water
1 ¾ cup


Method:
  • Take a sauce pan and boil together water and pineapple. Let the pineapple become soft.  Once softened, add sugar into it and boil for 2 minutes or till the sugar melt.  Remove it from the flame.
  • Heat a heavy bottom non stick pan, add ghee and rava into it.  Fry rava till it gets light brown. Simmer the flame and add pineapple sugar mixture into fried rava little by little to avoid formation of lumps.  Add food color and mix well.  Add chopped cashews and mix again.  Keep stirring. Cover it and let cook for about 8-10 minutes on low flame.
  • Remove from the stove and let it warm.
  • Garnish with cashews and sprinkles. Serve warm.


Have a bite :)

Notes:
  1. If during cooking the pineapple and rava together you find that some water is needed you can add a little bit of it, enough to cook the rava.
  2. Dry fruits you can add according to your choice.
  3. More ghee can be added if you like to.

Featured Post

Pineapple Laddoo